
Navigation › Documents › Processing › Invoices
Note: This article focuses on the minimum fields required to create an invoice.
To add a new invoice, click New (Ctrl+N) on the toolbar. This opens a new blank Invoice screen on the General tab.
Note: Depending on your configuration, some fields are automatically populated when selections are made.
General Tab
On the General tab, you have to complete the invoice's administrative information, such as customer and delivery information.
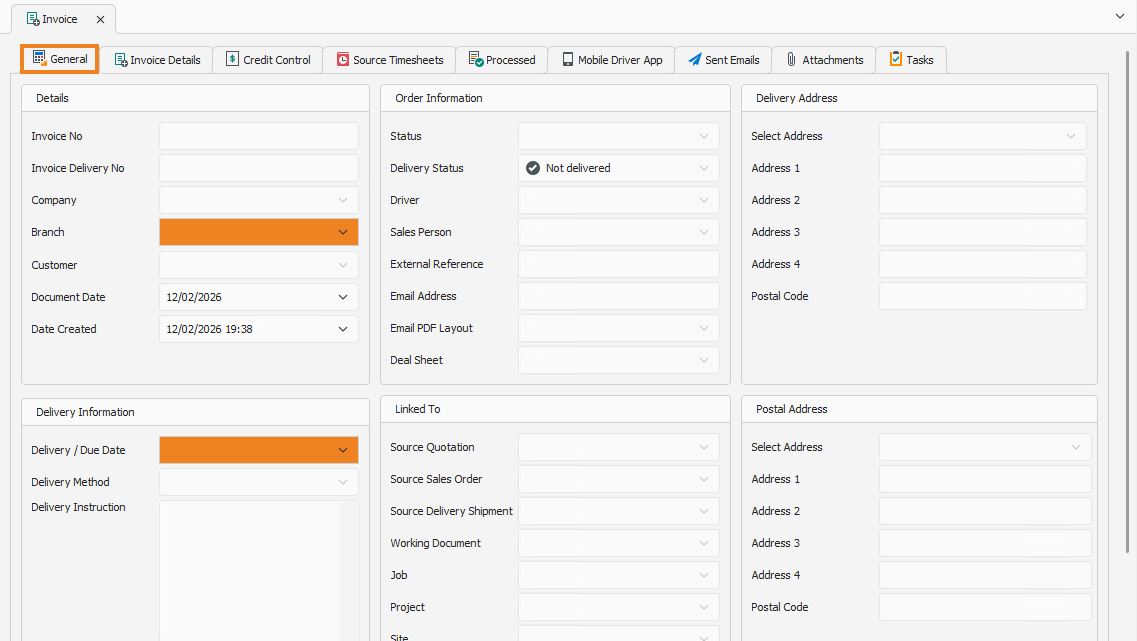
Details
- Select the Branch from which the invoice is being sent.
- Select the Customer requesting the invoice.
- The Document Date automatically populates to the current date. This date can be updated if required.
Order Information
The Order Information automatically populates from the customer information. This can be updated if required.
- Confirm or update the Sales Person for the invoice.
- Confirm the Email Address to send the invoice to.
- Confirm the Email PDF Layout for the invoice.
Note: An Email PDF Layout for invoices needs to be set up if one is required here. Depending on your setup, only a Print Layout may be available.
Delivery Information
- Confirm or update the Delivery/Due Date.
Once done, click Save (Ctrl+S). This saves the invoice, and a new sequential invoice number is generated in the Invoice No field. Click the Invoice Details tab to continue.
Invoice Details Tab
On the Invoice Details tab, you have to complete the invoice's product information, such as products and their quantities.
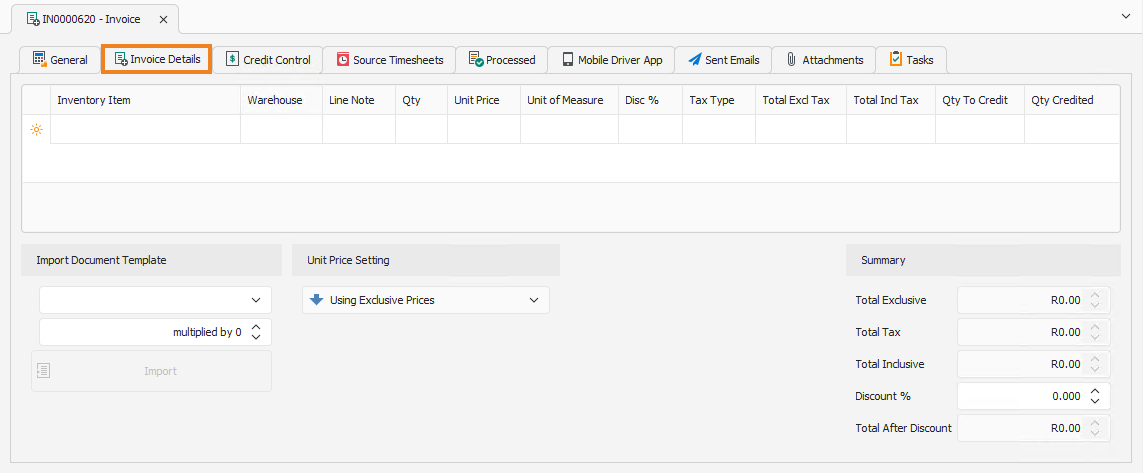
Note: Add a new line item to the list by clicking the empty cell under Inventory Item. Depending on your configuration, some fields may be automatically populated when a line item is selected.
- Select an Inventory item to add to the invoice.
- Confirm the Warehouse from which the item is sourced.
- Add a Line Note for the item, if you wish.
- Enter the quantity (Qty) or number of items to add to the invoice.
- Confirm the Unit Price for the item.
- Confirm the Unit of Measure for the item.
- Enter the discount percentage (Disc %) for the item to be applied to the invoice, if required. This discount is applied to the individual line item, not the invoice total.
Note: A discount can also be applied on the full invoice value, for all items captured. To do this, the discount is entered in the bottom right corner, in the Summary section.
- Confirm the Tax Type for the item.
- The individual line item totals are displayed as exclusive of VAT (Total Excl Tax) and inclusive of VAT (Total Incl Tax).
- The Qty To Process and Qty Processed columns are not relevant at this stage to generate a new invoice.
Repeat the above steps until all the required inventory items are added to the invoice.
Summary
On the Summary section (bottom right corner of the screen), confirm that the invoice totals are correct.

Once done, click Save (Ctrl+S). This saves the invoice. You can also press Ctrl +Enter to save and close the invoice.